Installing Sharp Printer Drivers on Windows 10
If you are a business that needs to install a Sharp printer driver on your Windows PC, you have come to the right place. Installing a Sharp printer driver is an important step in ensuring that your print jobs are done correctly and efficiently. In this blog post, we will explain installing the printer driver with detailed step-by-step instructions.
Step 1: Downloading the Driver Software
Before we get started with downloading your printer driver, you need to check and confirm your printer model. You’ll also need to confirm your personal or office computer’s operating system is working off of Windows 10, before you start the setup process.
Note: The process outlined here should be like the download and install instructions for Windows 11.
The first step in installing a Sharp printer driver is to download the software from the manufacturer’s website.
Navigate to https://business.sharpusa.com/Product-Downloads.
Enter your printer or MFP product information in the fields below.
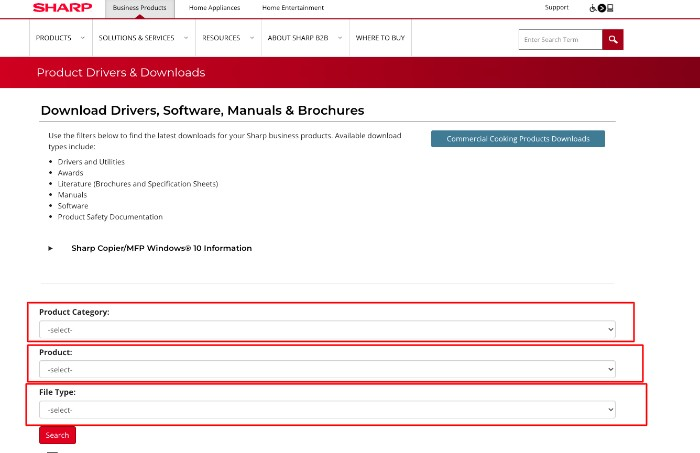
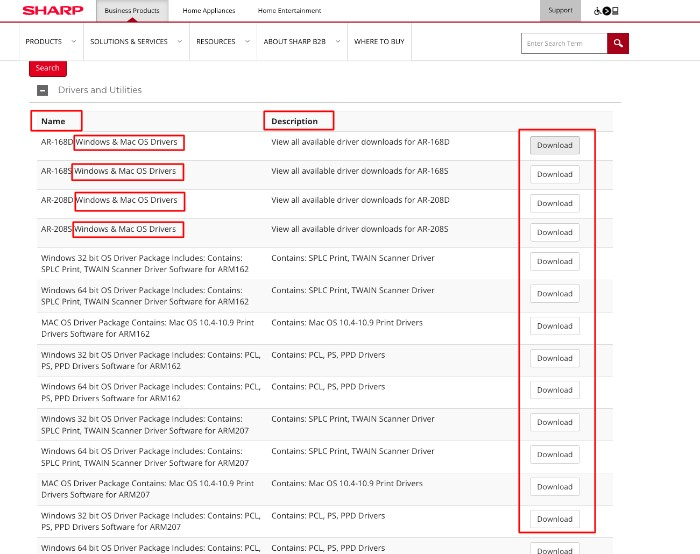
Locate the correct driver by the “Name” and description column.
Click “Download” for your correct product name and description.
Select the correct operating system from the menu below.

On the next page, you may have the choice between downloading the printer driver, utility software, copier software, etc.
Select which you need and download the corresponding drivers.
Once the driver(s) have finished downloading, double-click on the file to begin installation.
Step 2: Installing the Driver Software
Once you have opened up the downloaded file, follow through each step of installation carefully until it is complete.
At some point during this process, you may be asked whether or not you want to enable automatic updates for this driver. If so, you may want to select yes to ensure your device automatically installs future updates on your computer as they become available.
After completing all steps in installation, reboot your computer to make sure that all changes take effect properly before proceeding with any further steps related to printing using this driver software.
Step 3: Connecting Your Printer
The next step is connecting your printer via USB cable or wireless connection (depending on what type of connection was included with your device).
Make sure that both ends of the cable are securely connected and then turn on your device once it has been plugged into a power source.
At this point, Windows should recognize that a new device has been added and prompt you for further information about it; simply follow through these steps until installation is complete and then proceed with printing jobs as normal using this newly installed driver software.
Contact MOST for Additional Assistance
Installing a Sharp printer driver can be an intimidating task, but it doesn’t have to be. This guide and the streamlined process that Sharp has put in place should make your printer, copier, or MFP driver installation as quick and seamless as possible.
If you have further questions about driver installation or are in the market to buy, lease, or need maintenance or repairs for an industrial printer, office copier, or MFP for your business in Columbus, Ohio — contact our team at Mid Ohio Strategic Technologies today.